
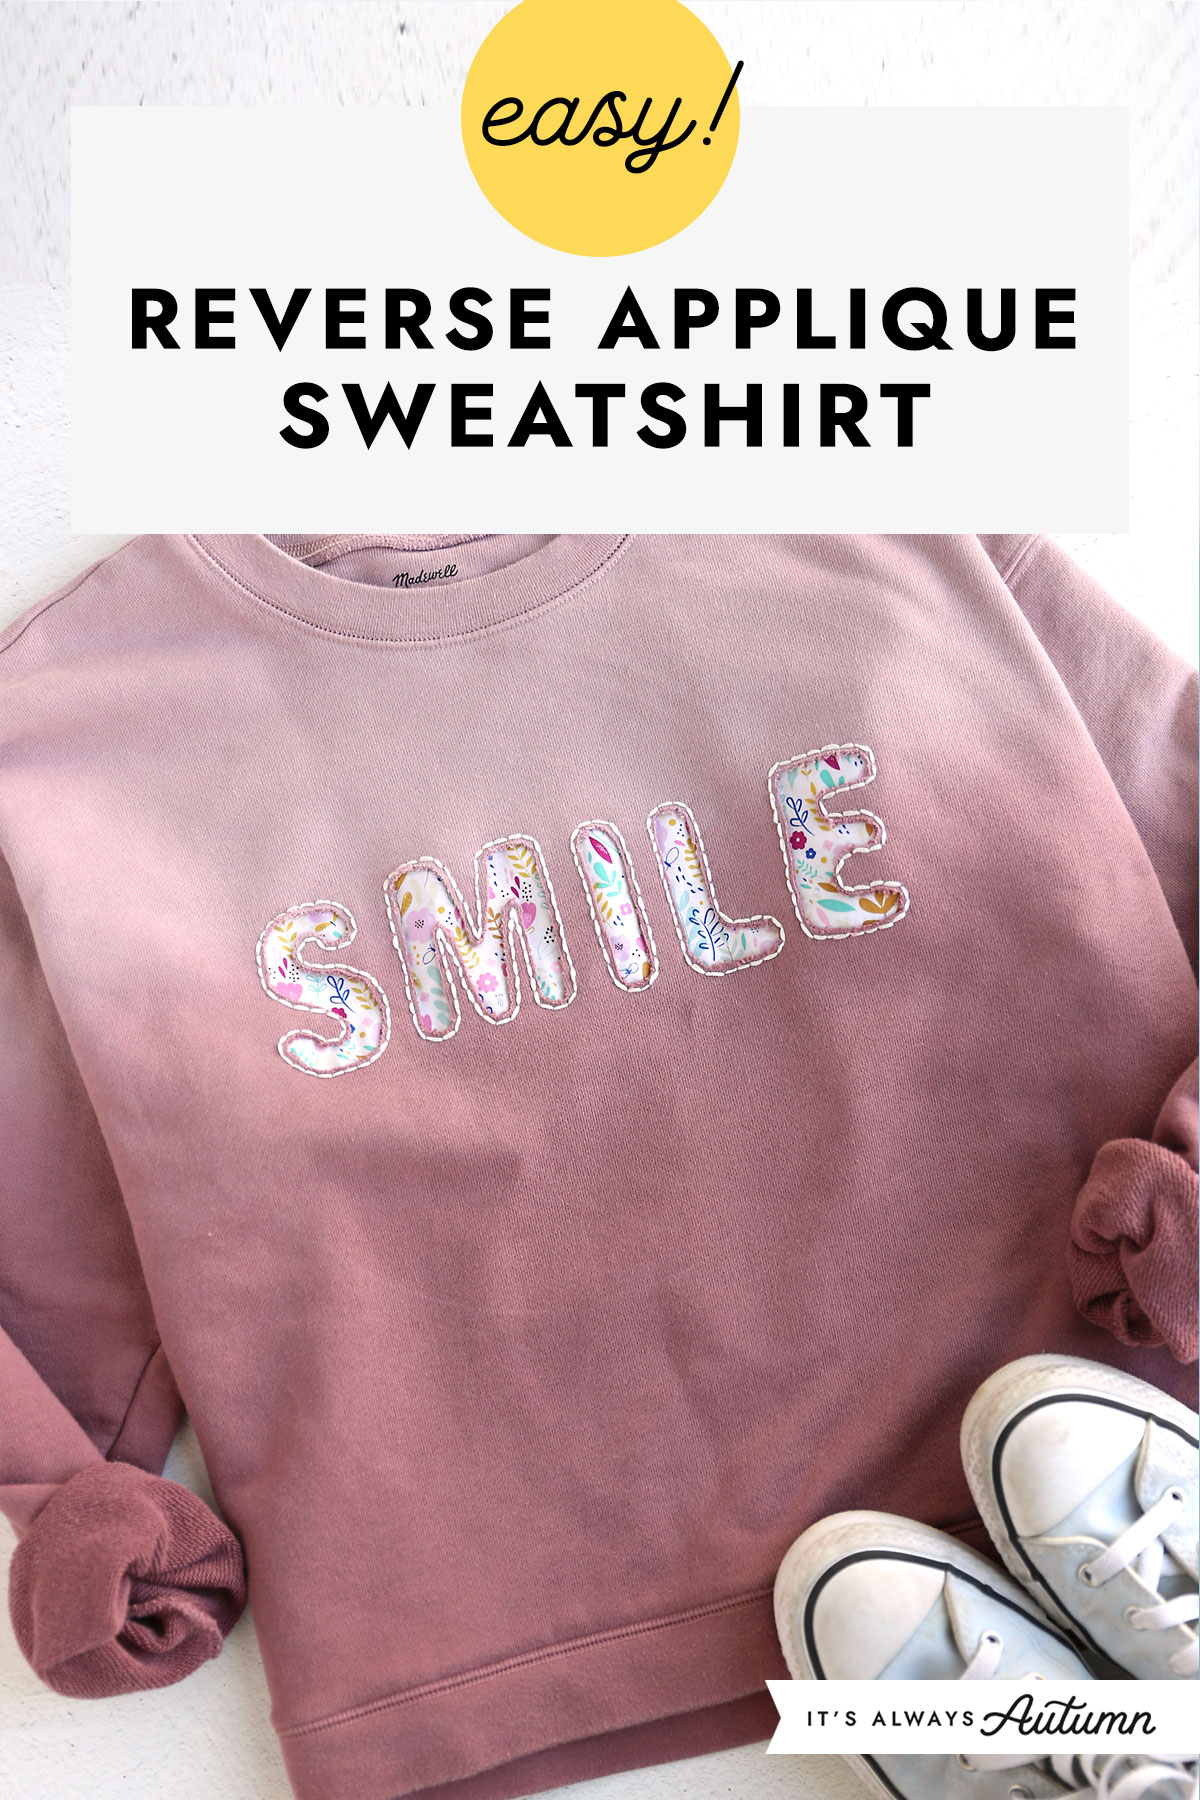
In today’s post: Learn how easy it is to dress up a thrifted sweatshirt with reverse applique – no sewing machine or sewing experience needed! This is an easy craft for teens or adults that you can complete in a couple of hours.
Easy Craft Idea for Teens and Adults
Reverse appliqué is a fun and easy craft, and the best part is you don’t need any sewing experience or even a sewing machine to create a project. You could even work on this project during a craft night with friends! Use thrifted sweatshirts to keep the cost very reasonable and have fun stitching together.
What is Reverse Appliqué?
Applique is a technique where smaller pieces of fabric (usually in colors or prints) are sewn onto a bigger piece of fabric to create a design. In Reverse Applique, the printed fabric is stitched behind the bigger piece of fabric, then the negative space inside the stitching is cut away to reveal the design.
Reverse applique is easy because you don’t have to finish the edges of each smaller piece since they are behind the main fabric. For this project we use a super simple embroidery stitch that’s easy to learn, making this tutorial perfect for beginners!
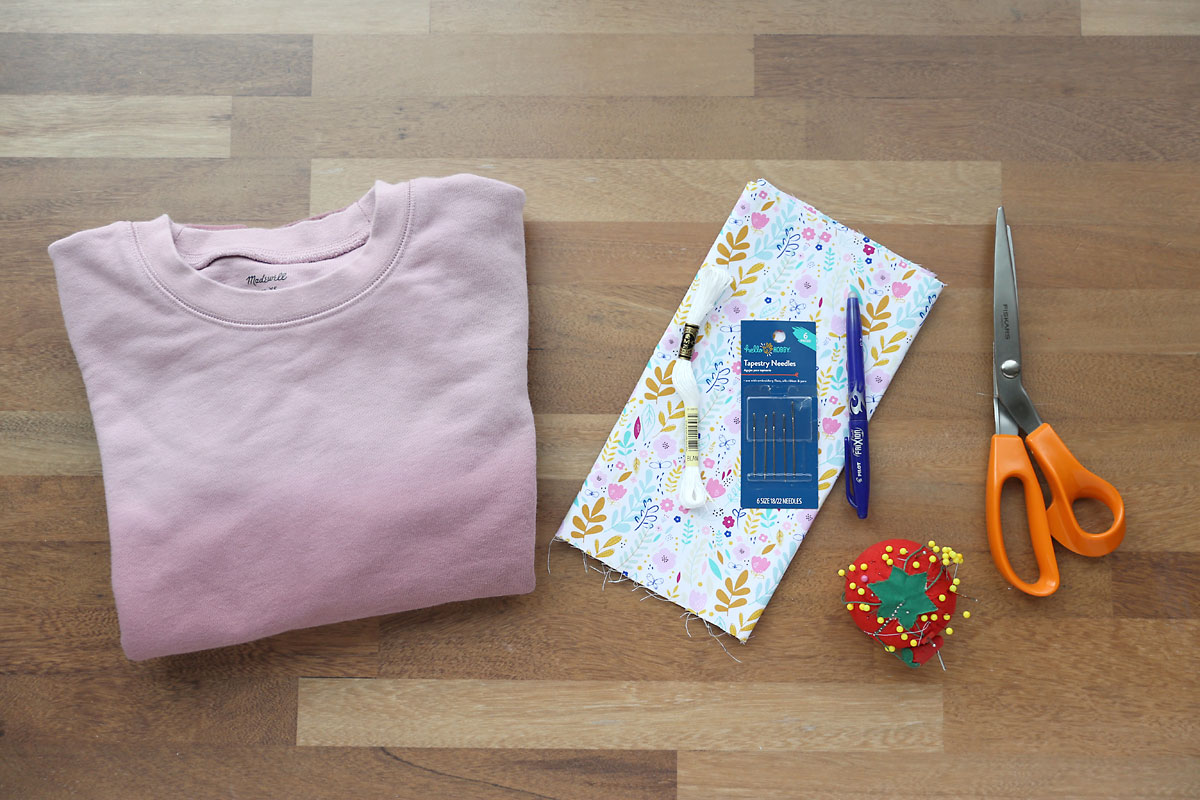
Supplies
Here’s what you need to make a reverse appliqué sweatshirt:
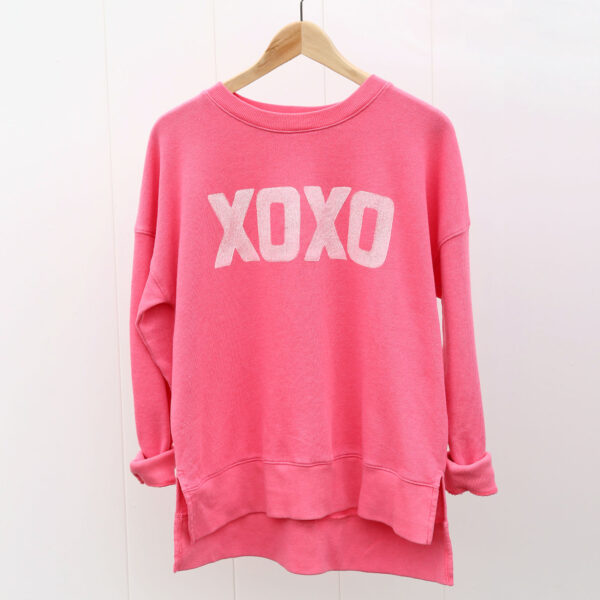
- Sweatshirt: Grab an old sweatshirt from your closet that needs new life or look for a cute one from the thrift store – the one I used in today’s post only cost $5. You can do reverse applique on other clothing items, but a sweatshirt is a great first project because the fabric is pretty stable and it won’t fray, which is important since you’ll be cutting into it.
- Contrasting Cotton Fabric: You want to use a non-stretchy fabric for the design, like a quilting cotton. You’ll only need a small amount, so look for fat quarters in cute designs or use scraps. You can use a different fabric for every letter if you like, but that will be a bit more complicated. I love how my sweatshirt turned out using just one fabric.
- Embroidery Thread: Choose a color that complements your contrast fabric and will pop against the sweatshirt. You can find embroidery thread at craft stores and usually at Walmart.
- Large Eye Needles: I used tapestry needles found in the sewing section of Walmart. The needle eyes need to be large enough that the embroidery thread will fit through.
- Fabric Marking Pen: You’ll trace your design onto the front of the sweatshirt, so it’s nice to have a fabric marker that will wash away or disappear with heat in case the thread doesn’t completely cover the outline.
- Pinking Shears: Pinking shears are used to trim the cotton fabric inside the sweatshirt so it doesn’t fray much when washed.
- Fabric Scissors
- Pins
- Embroidery Hoop: Using an embroidery hoop is optional, but it makes the stitching easier so I’d recommend grabbing one – they are pretty inexpensive at Walmart.
How to Reverse Applique a Sweatshirt
Trace the Design
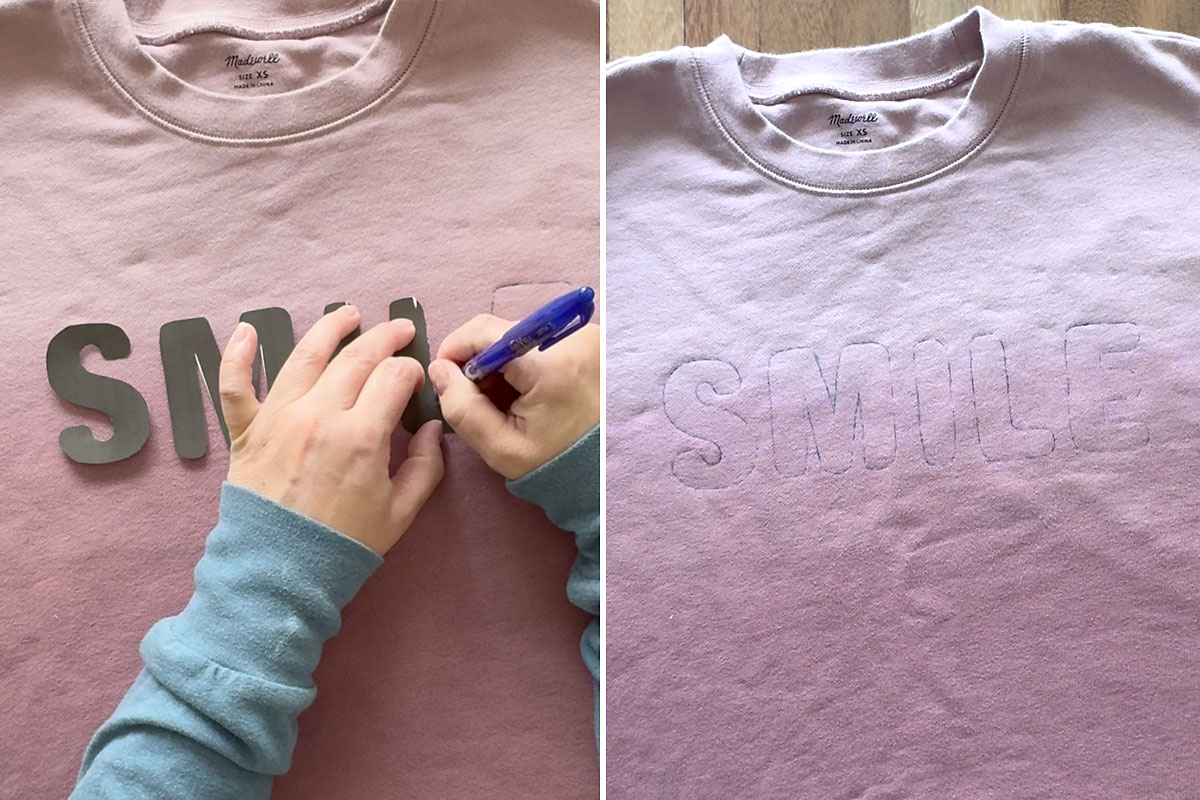
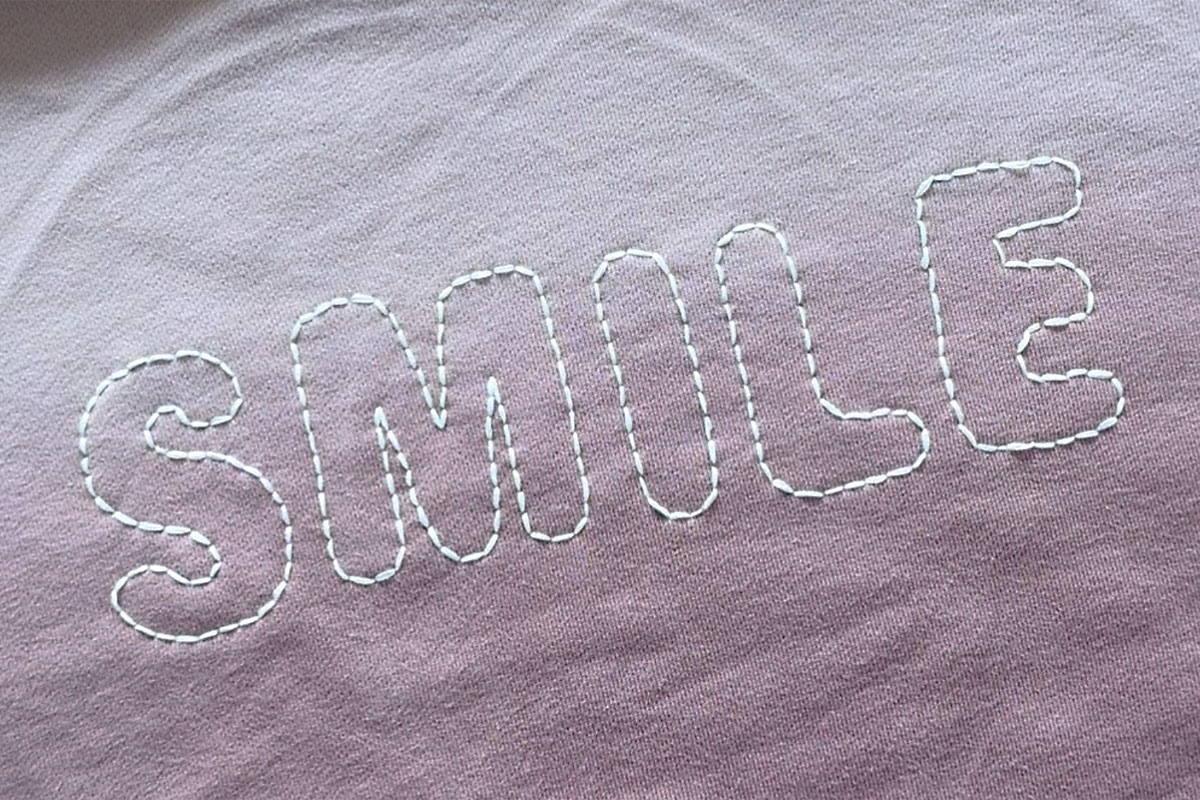
Begin by printing out whatever design you’d like to use. Measure your shirt first and decide how big you’d like your design to be. I printed out the word “smile” in all caps, using a bold Helvetica font in a size that would make it fill an entire piece of paper. I printed the letters onto card stock, which makes them easier to trace. Then cut out each letter, rounding the edges as you cut if desired, and place them down on the sweatshirt where you want them. Remember to leave a little room in between each letter.
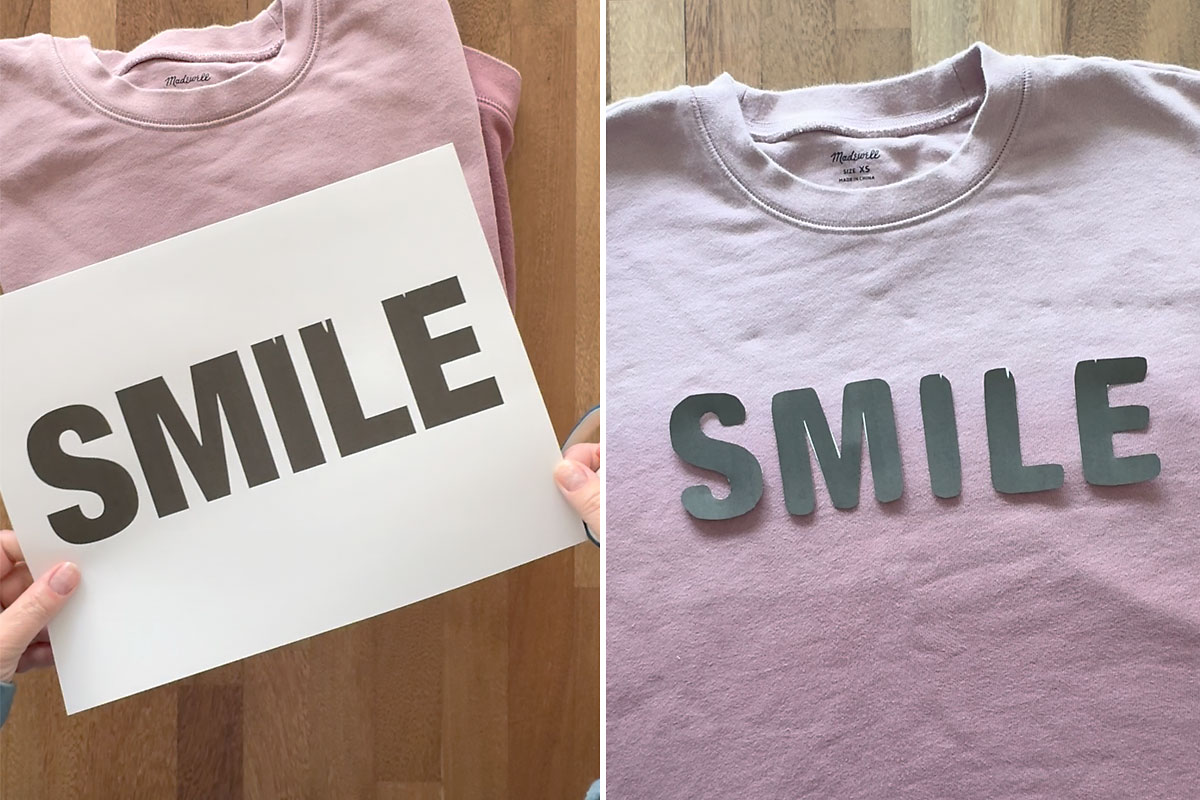
Now it’s time to trace each letter. I used a Frixion pen, which disappears with heat. If you don’t want to purchase a specific fabric marking pen, you can just carefully and lightly trace with a normal ballpoint pen. I tested this out and the embroidery thread covered the pen quite well once it was complete; however you may be able to see the marks a little so if that matters to you stick with a fabric marking pen that’s made to disappear.
Add the Contrast Fabric
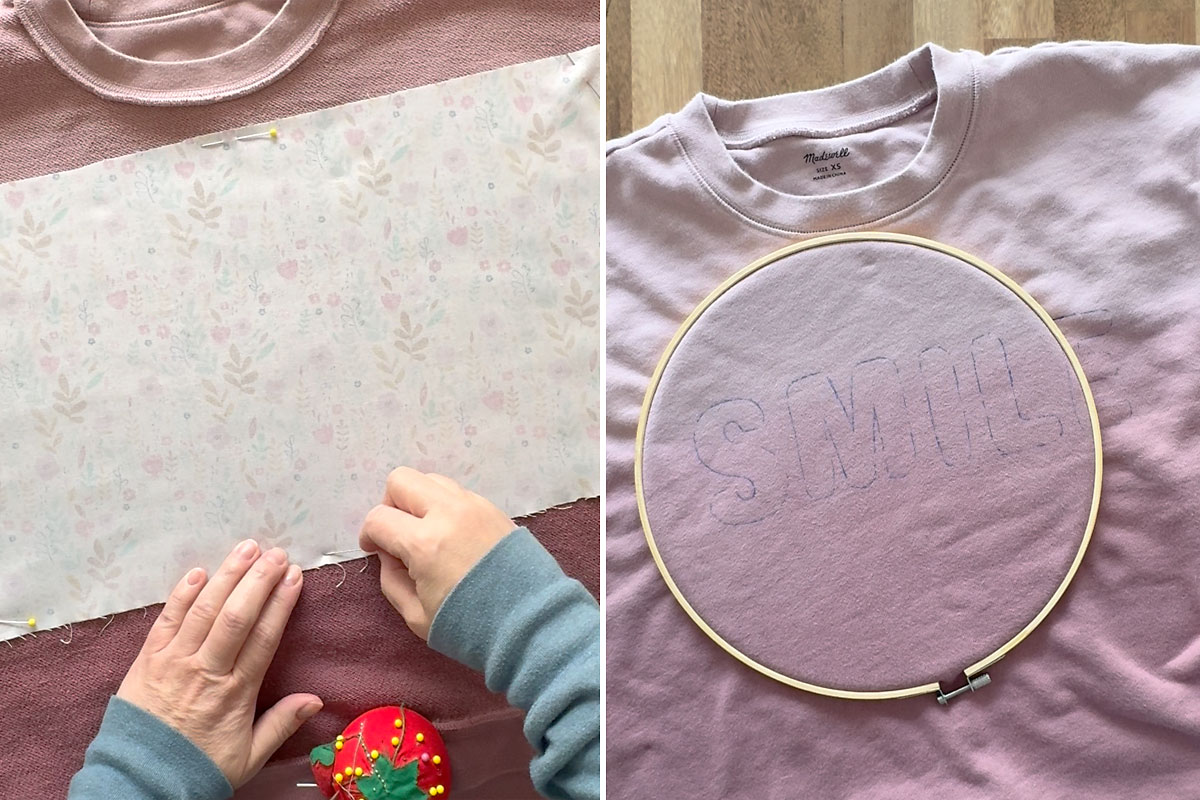
Next, turn the sweatshirt inside out. Place a piece of contrast fabric over the area where the letters are traced, with the RIGHT SIDE (printed side) FACING the sweatshirt. Smooth out both fabrics and pin them together along the edges. Then turn the sweatshirt right side out, and secure both layers of fabric in an embroidery hoop as shown below. (If you choose not to use an embroidery hoop, you’ll want to use a lot more pins to secure the fabrics together and ensure they don’t move around as you stitch.)
Embroidery along the Lines
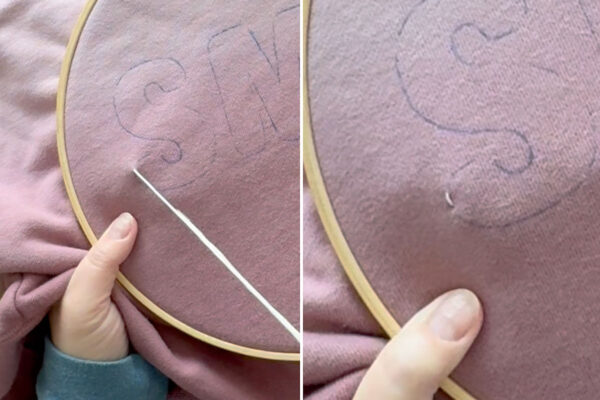
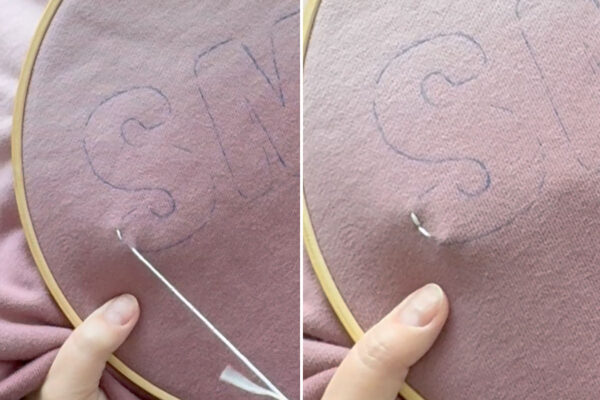
Ok, now it’s time to embroider along the lines! We will be using an easy, basic embroidery stitch known as the backstitch to cover up the outlines you just drew. Cut a length of embroidery thread and thread a needle, then tie a knot at one end of the thread (do not split the embroidery thread, use all six strands as one). Start with the needle inside the sweatshirt and poke it up, then pull it all the way through to the knot. Then poke the needle back down 1/4 inch away from where you came up, and pull it all the way down.
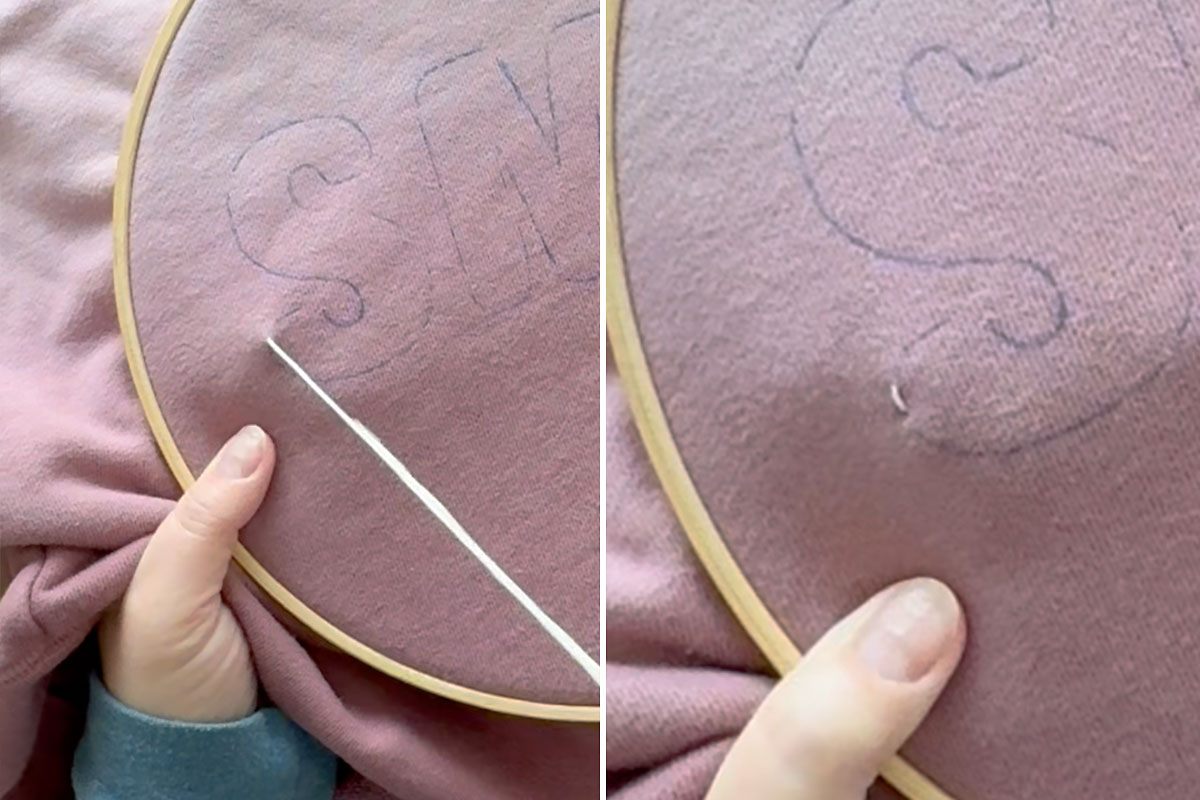
Moving along the outline, poke the needle up 1/4 inch from where you just went back down and pull the thread through. At this point, you are going to go BACKWARDS and poke the needle down right where the first stitch ended. (If this is confusing, check out this video.)

Then you’ll repeat this pattern: bring the needle up through the sweatshirt 1/4 inch past the end of your last stich, then go back to put the needle back down meeting the end of the last stich. This is will give you a continuous outline of stitches. When you finish a letter or run low on thread, tie a knot on the inside of the shirt by sliding your needle under a stitch you’ve already made, pulling it most of the way through to create a loop, then sending the needle through the loop and pulling tight to tie a knot.
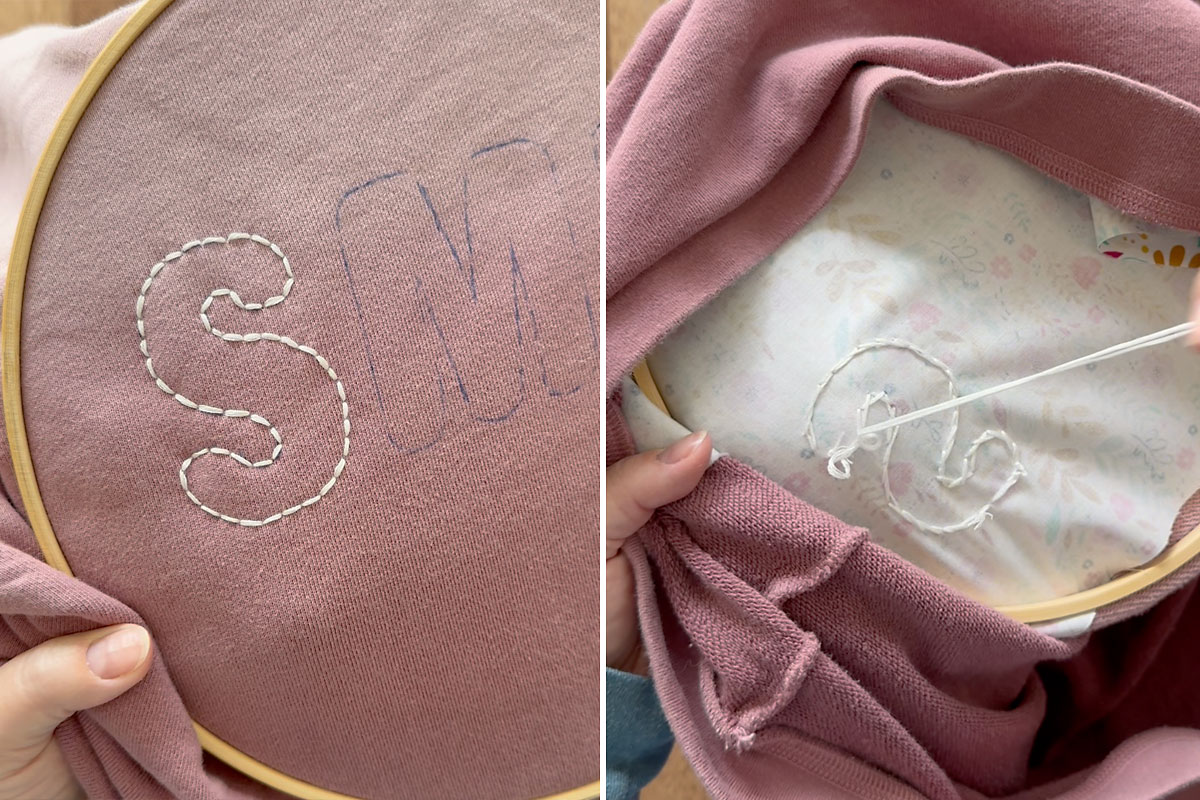
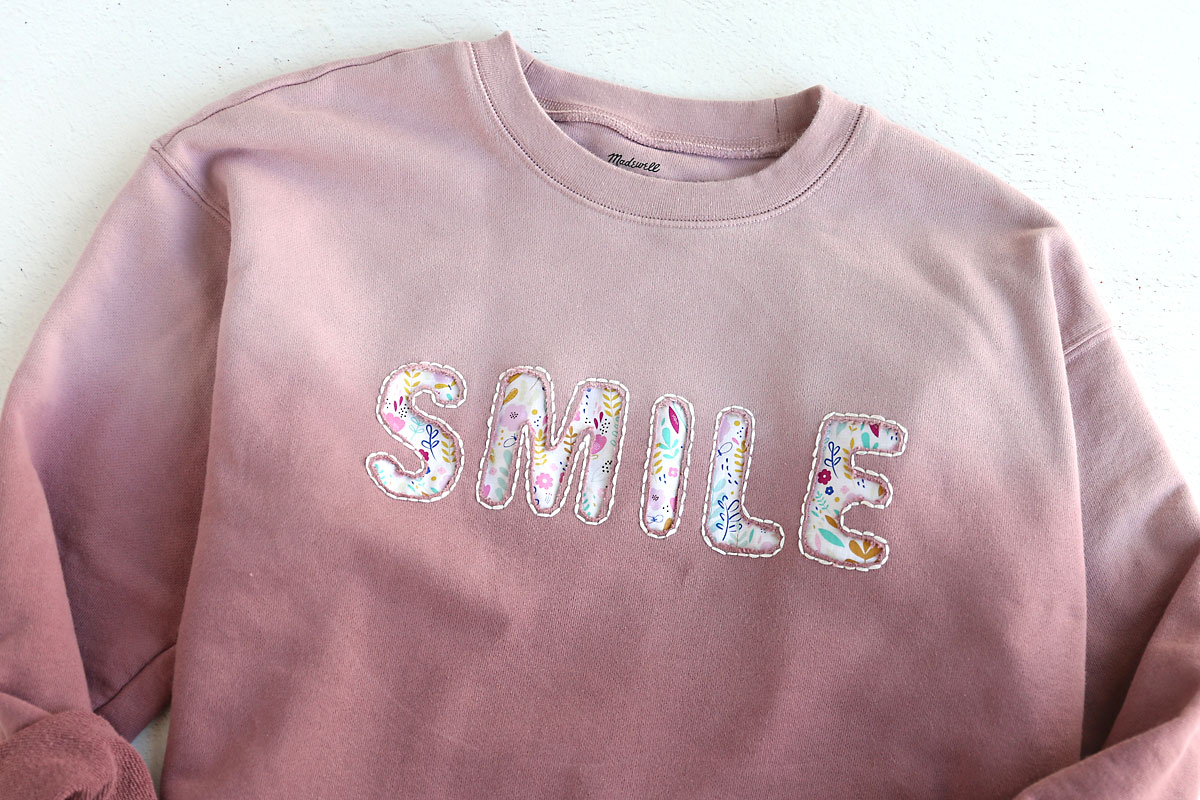
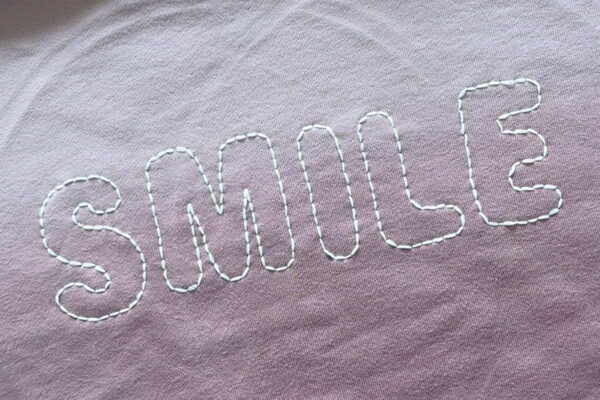
Here’s what my sweatshirt looked like once I’d completed all the stitching:
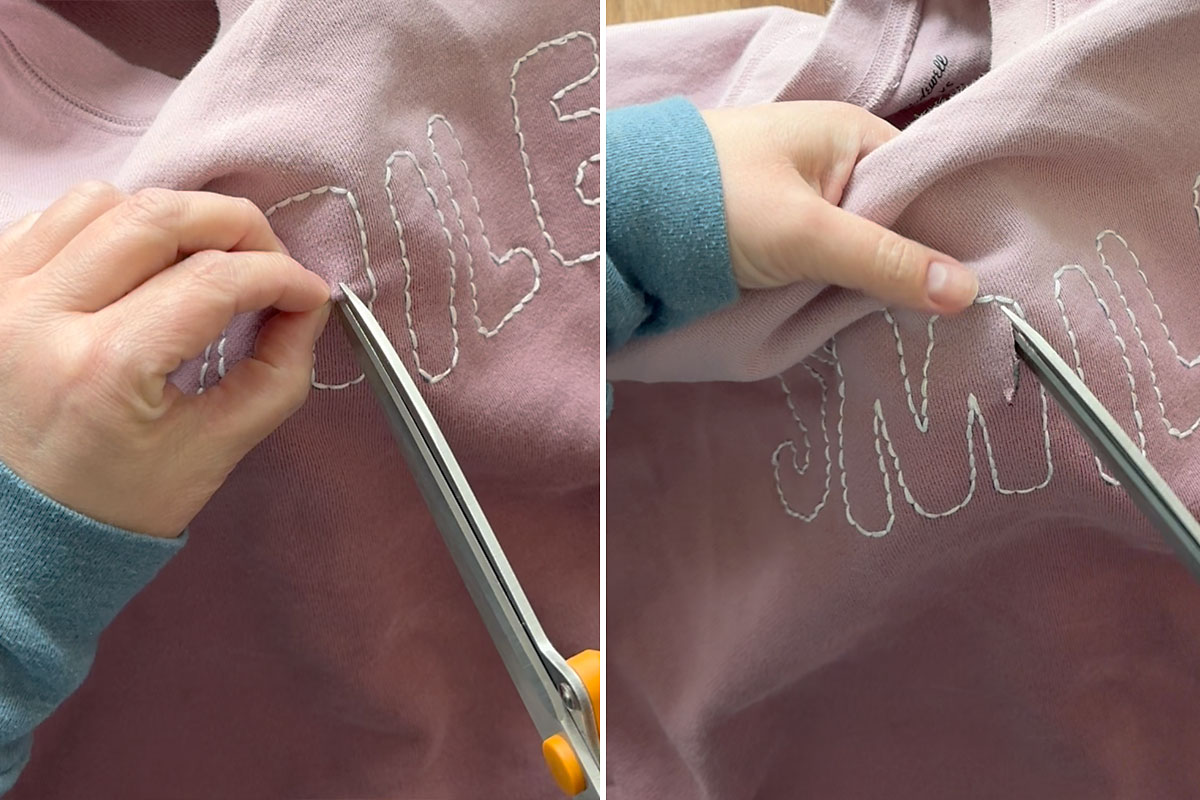
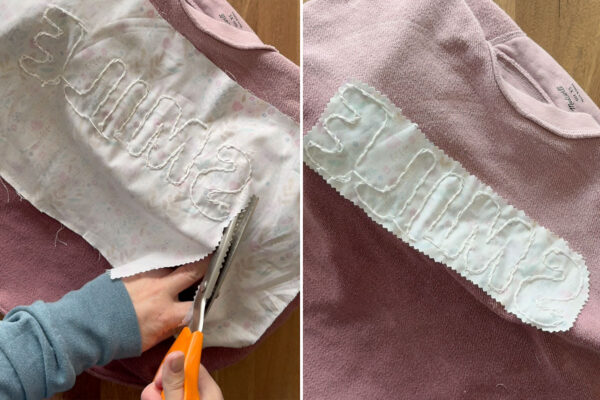
Trim away excess fabric
Turn the sweatshirt inside out and use pinking shears to trim away the excess fabric. As you trim, be sure to leave a border of about an inch around the embroidery – leave more of the contrast fabric around the embroidery than you see in the photo below! I did not leave enough of the contrast fabric and when I washed the sweatshirt one spot ended up fraying and leaving a small hole.

Cut to reveal the design
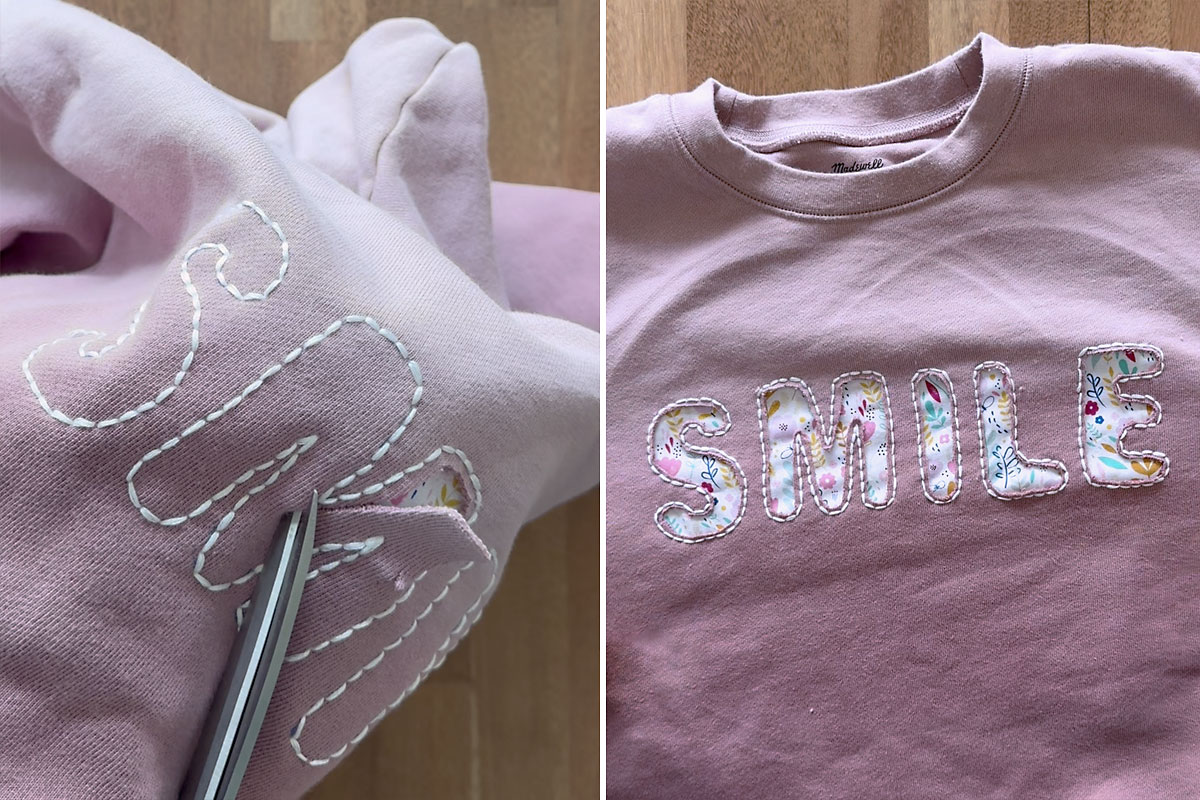
Time for the reveal! Hold the sweatshirt both inside and out and pull the two layers of fabric away from each other inside a letter. Then carefully snip just the sweatshirt layer to make a small hole. Then cut just the sweatshirt material along the inside of the embroidered lines. Take care not to cut through any of the embroidery, and not to cut through the contrast fabric at any point. Just use small snips to cut away only the sweatshirt fabric. Fabric scissors will be much easier than normal scissors for this job.
Repeat the process with each letter until your entire design is revealed.
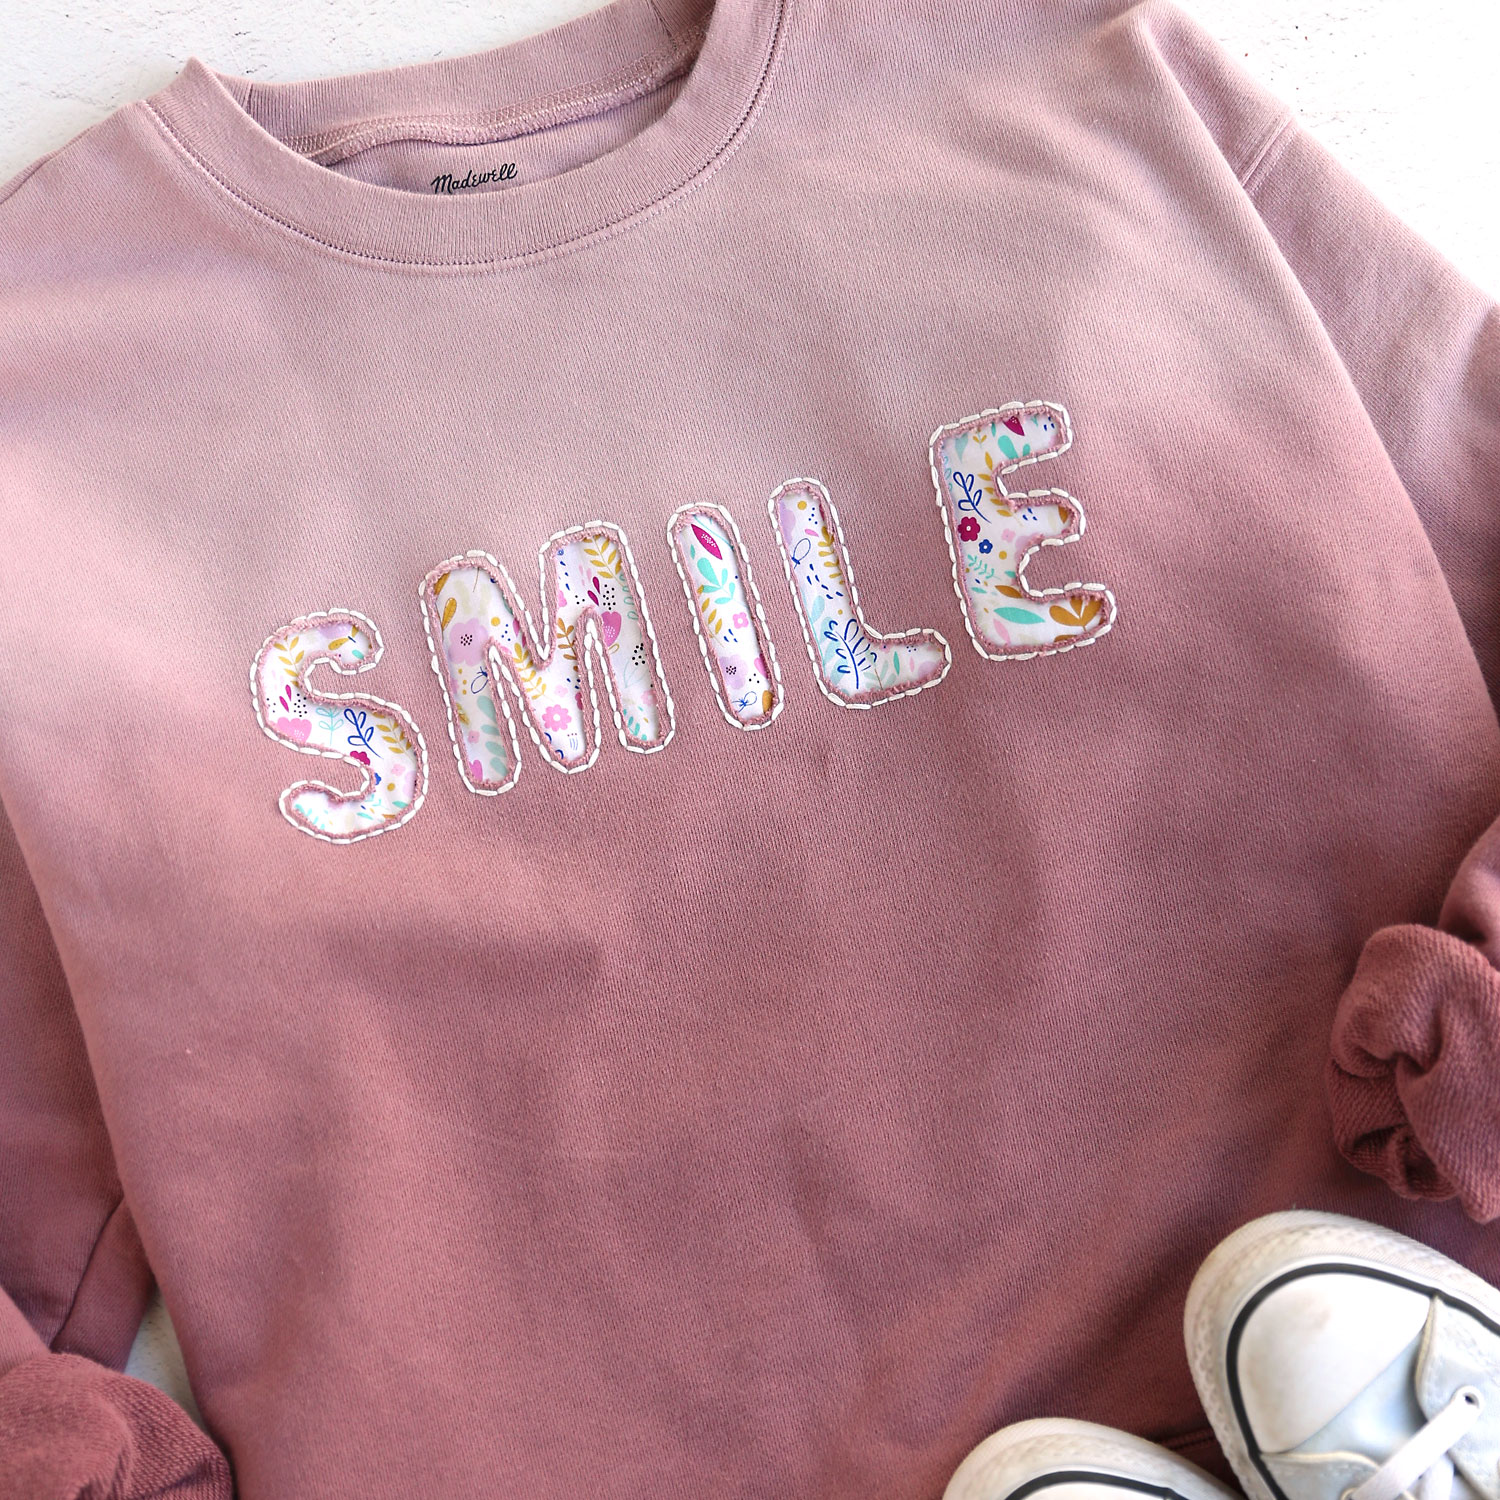
Reverse Applique Sweatshirt
Supplies
- Sweatshirt
- Contrasting Cotton Fabric non-stretchy
- Fabric Marking Pen
- Large Eye Needles
- Embroidery Floss
Want more project ideas? Sign up to get my favorite easy crafts and recipes straight to your inbox!
Equipment
- Pinking Shears
- Sewing Scissors
- Pins
- Embroidery Hoop optional but makes the process easier
Instructions
- Print out the design you'd like to use and cut it out, then lay the pieces down on the sweatshirt where you want them.

- Carefully trace around each letter.
- Turn the sweatshirt inside out and lay a piece of the contrast fabric with the right side (printed side) facing down to the sweatshirt. Pin it along the edges. Flip sweatshirt right side out and sandwich both layers of fabric between an embroidery hoop. (If you don't use a hoop, use lots of pins to ensure the fabric doesn't move around.)
- Thread the needle with embroidery thread (using all six strands as one) and tie a knot in one end. Begin embroidering along the lines you have traced. Poke the needle up from inside and pull the thread through to the knot. Moving along the line, poke the needle back down 1/4 inch away from where you came up and pull the thread through.
- Moving along the line again, poke the needle up 1/4 inch away from where you just went down. Now you'll go BACK, poking the needle down at the end of the stitch you just made.
- Continue to backstitch until you have completed the outline of the letter. Come up 1/4 inch past the end of your last stitch, then go back and poke the needle down at the end of your last stitch. This gives you a continuous stitch line. When you need to start new thread, knot the thread inside the sweatshirt.
- Continue until all letters are outlined.
- Turn the sweatshirt inside out and use pinking shears to trim away excess fabric, being sure to leave an inch border of the contrast fabric (that is more than you see in the photo here – if you trim too closely when you wash the shirt the fabric may fray past the embroidery).
- Turn the sweatshirt right side out and pull the two layers of fabric apart inside one of the letters. Using fabric scissors, carefully snip just the sweatshirt layer to make a small hole. Then cut just the fabric material inside the embroidered lines. Take care not to cut through any of the embroidery, and not to cut through the contrast fabric at any point. Just use small snips to cut away only the sweatshirt fabric.
- Repeat the process with each letter until your entire design is revealed.


Judy says
Speaking from experience, wash the fabric first to prevent-shrink it to avoid distortion later.