
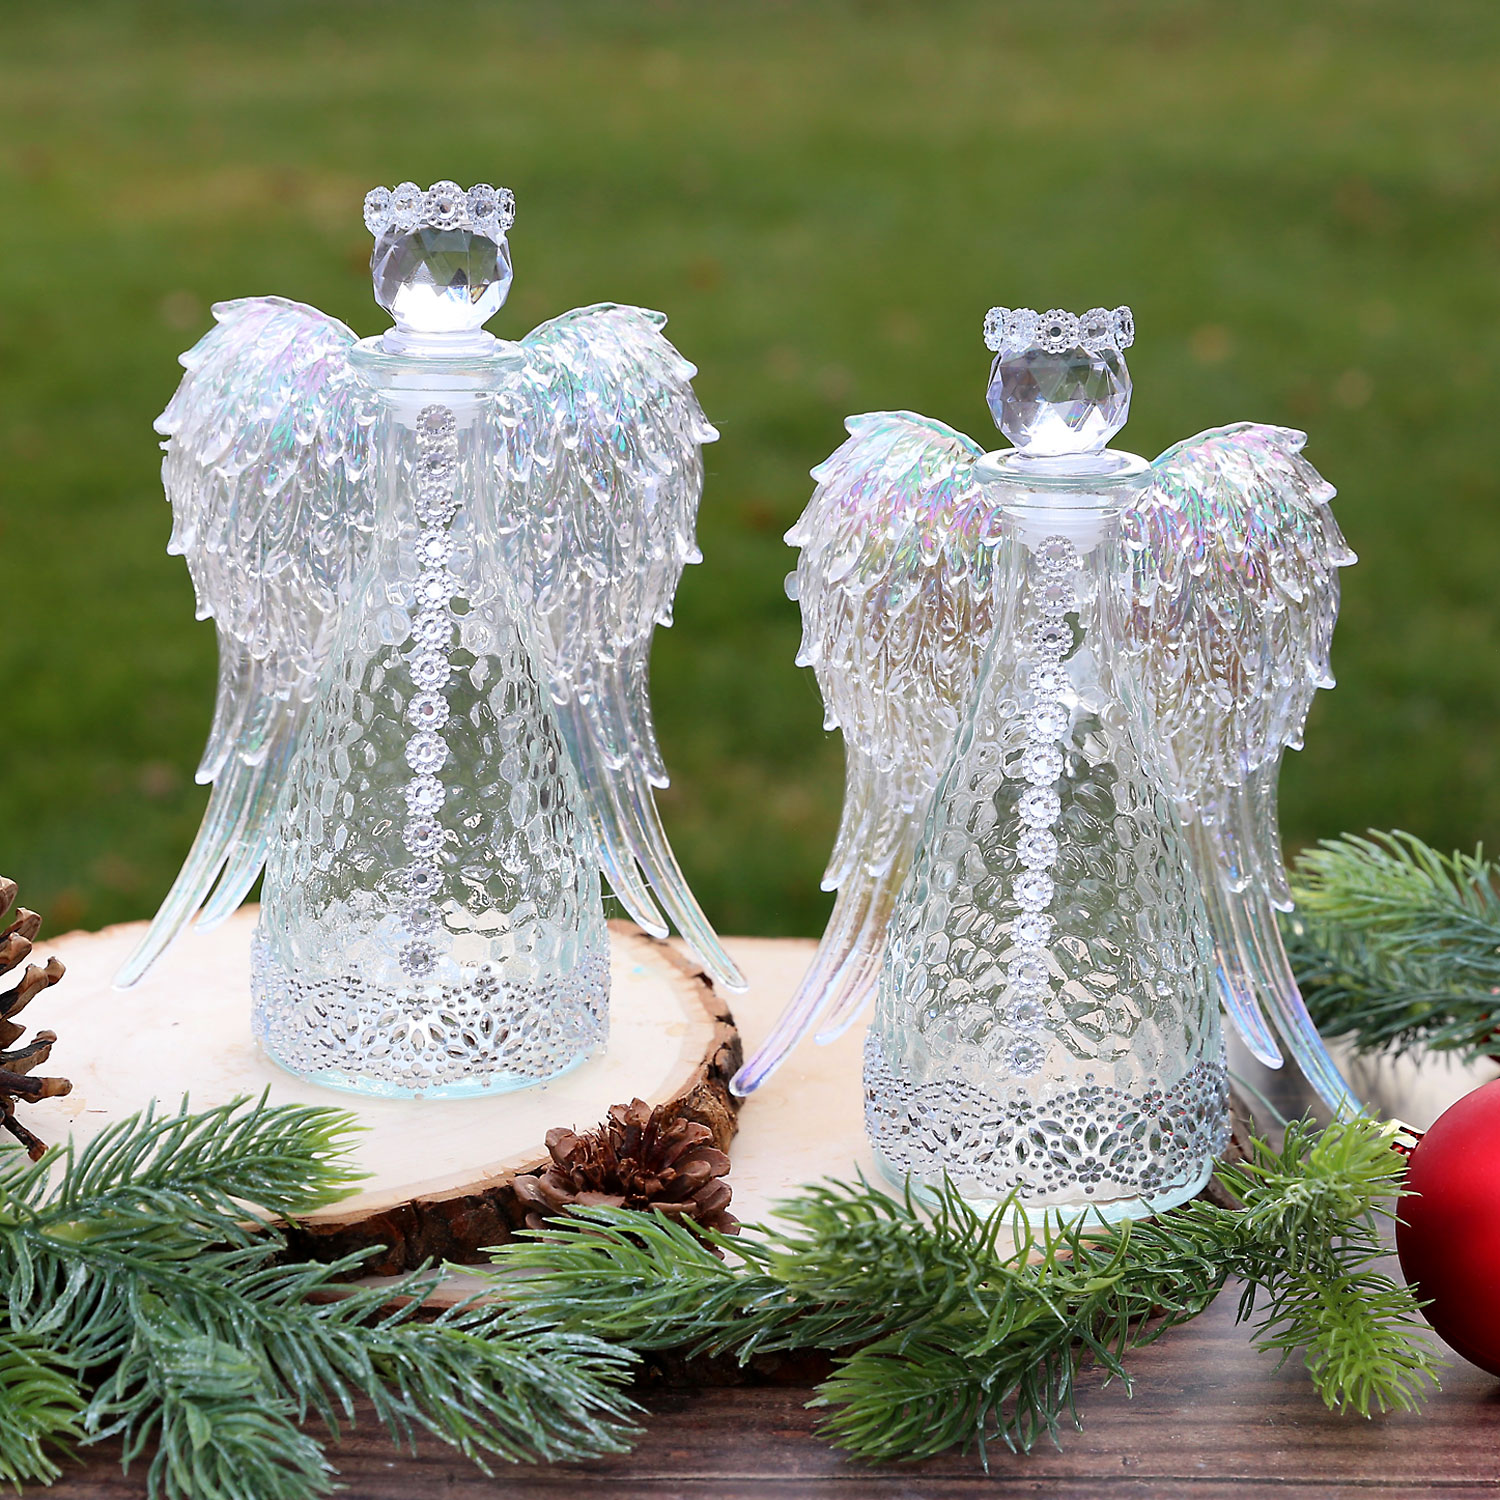
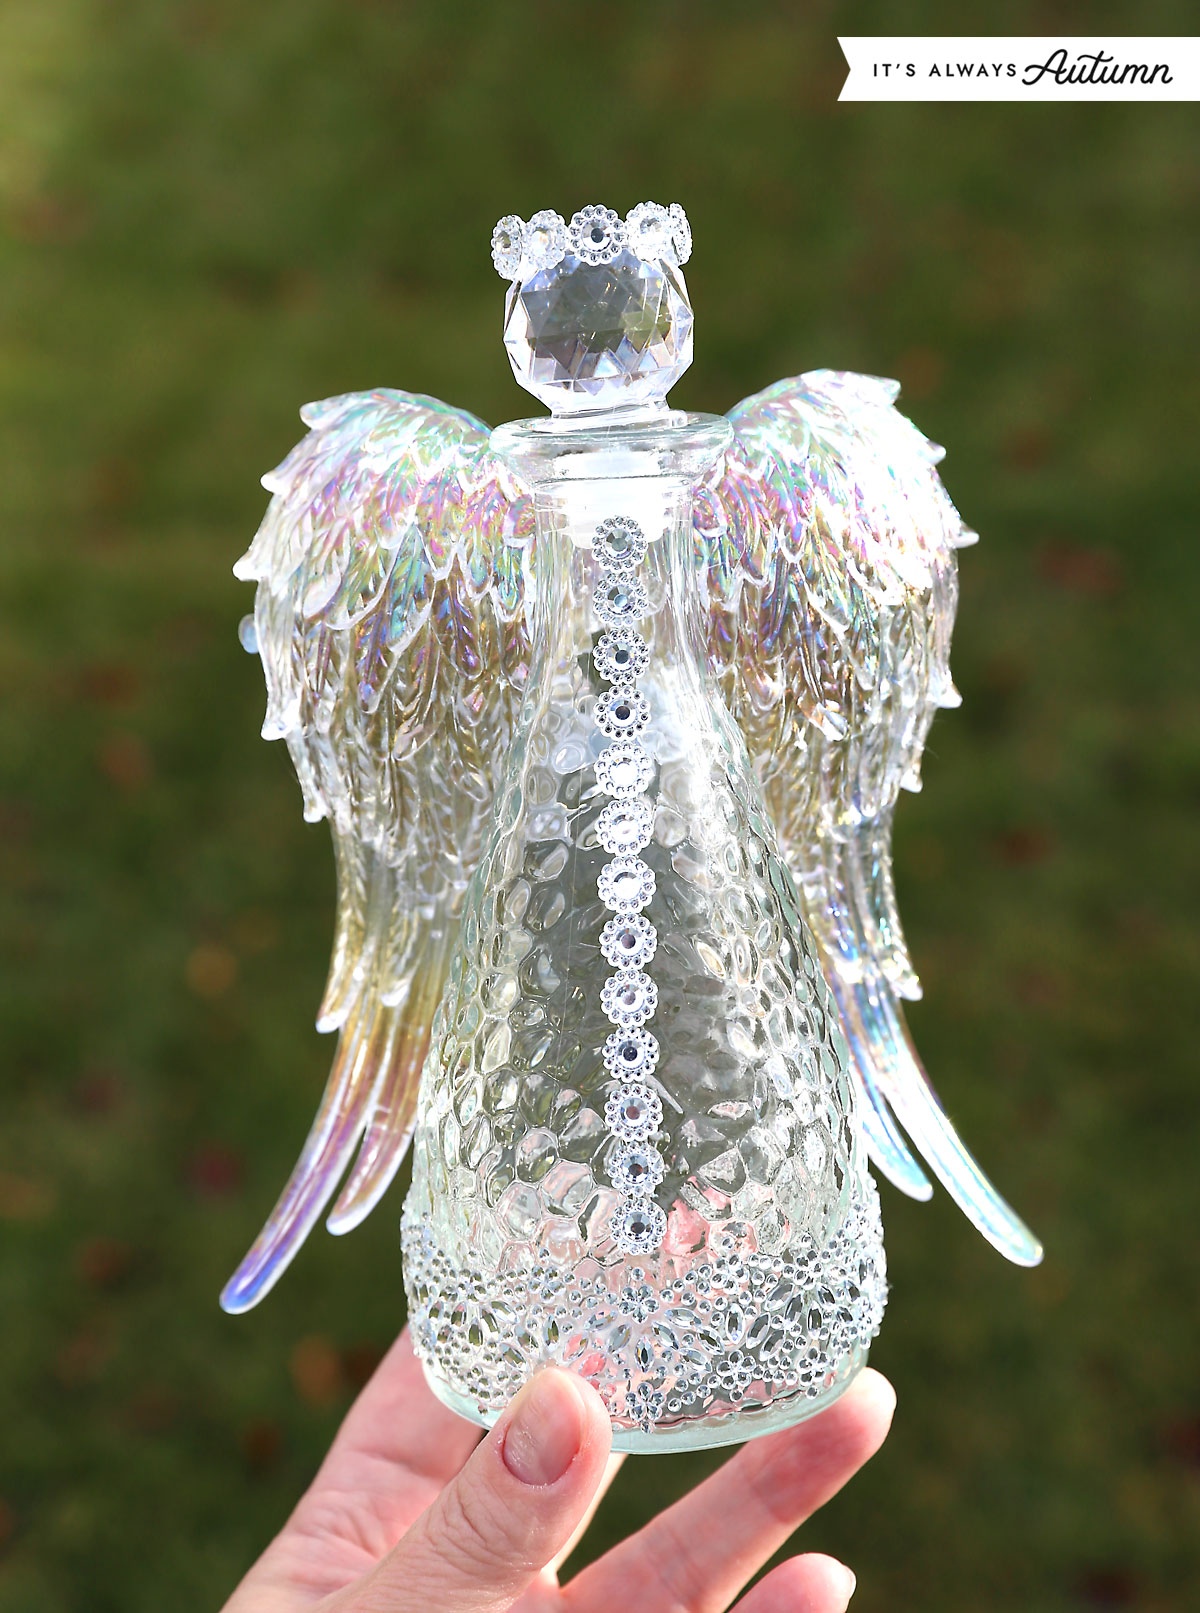
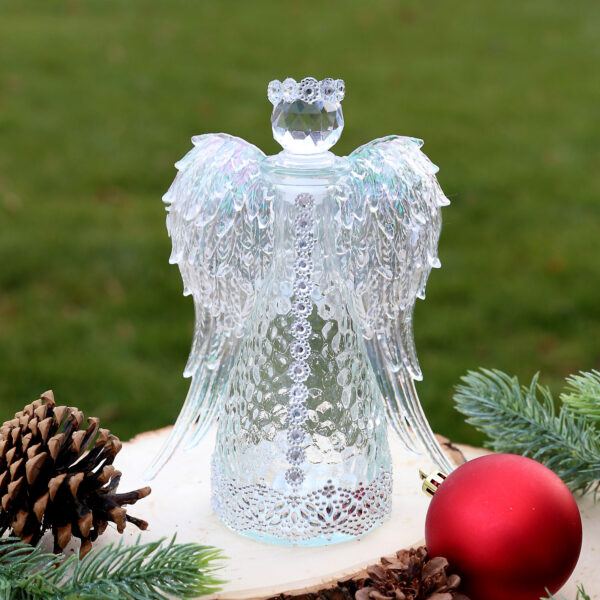
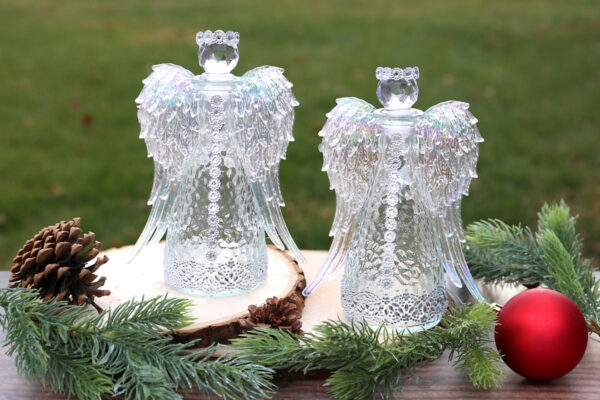
In today’s post: Learn how to make beautiful glass bottle angels – they only take four supplies, all from Dollar Tree! This is an easy Christmas craft for adults you can complete in under thirty minutes.
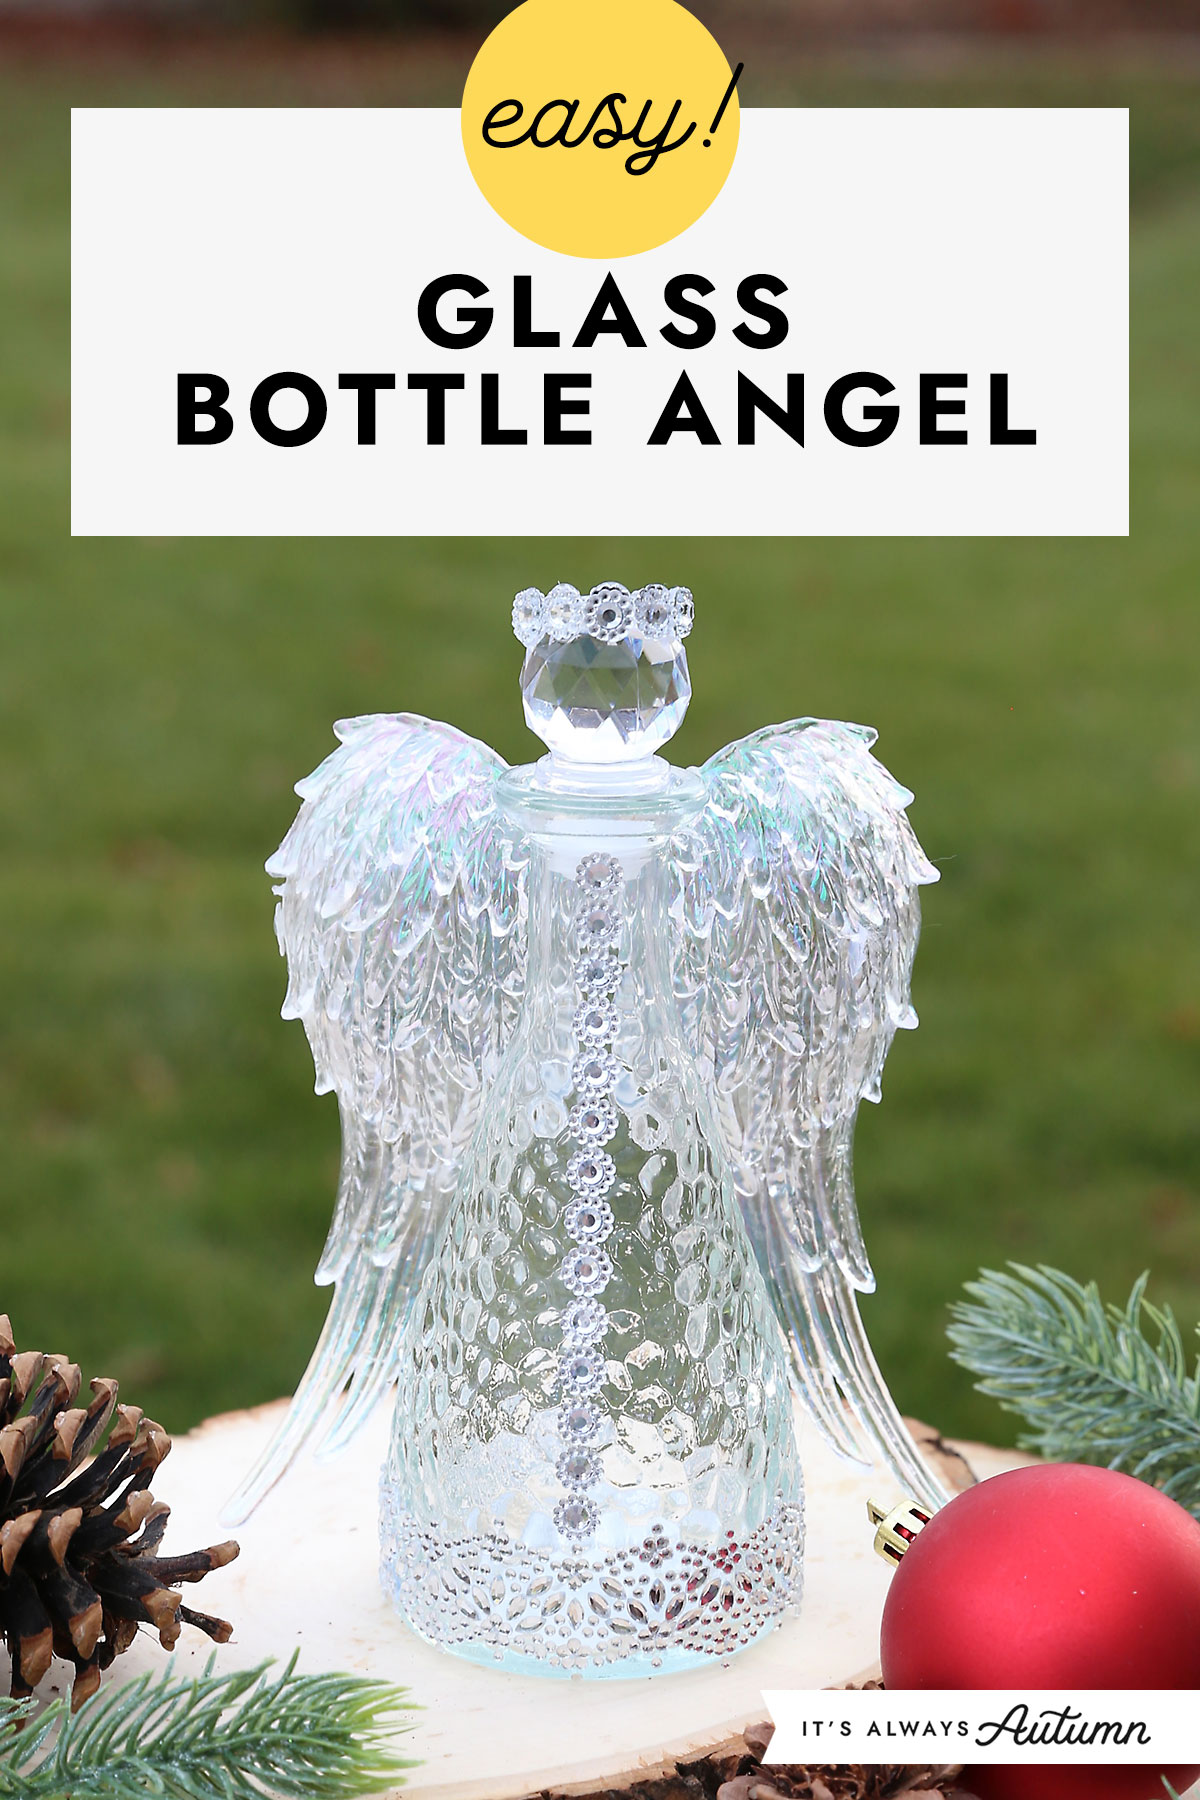
Today’s project is very easy and turns out quite beautiful! These angels start with a pretty hammered glass bottle from Dollar Tree: the bottle acts as the angel’s body and the stopper is her head. You’ll add a pair of wings on the back and some jewel sticker embellishments to complete your glass bottle angel.
Idea Source: Gnome and Backyard Creative Crafts, I used different wings and simplified making the halo.
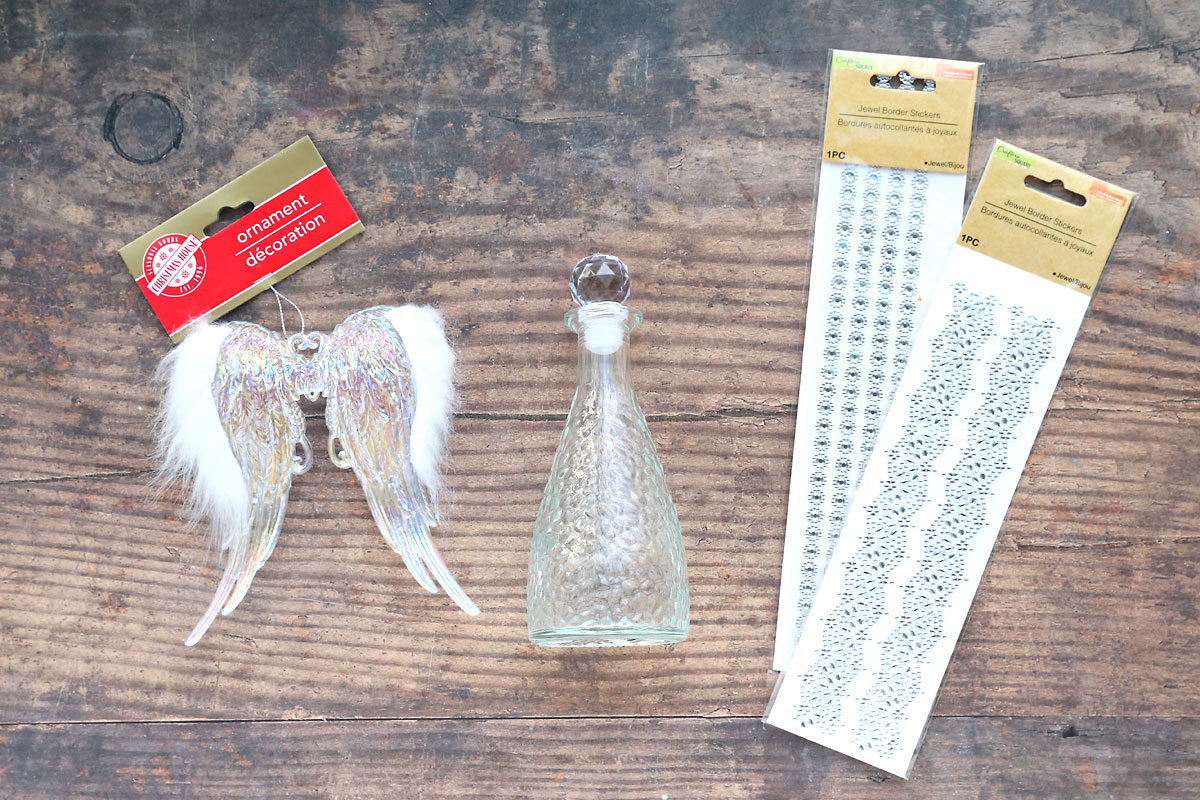
Supplies
You only need four things, all found at Dollar Tree, to make these angels:
- Decorative Hammered Glass Bottle w/Stopper: I found these bottles in the craft area at my Dollar Tree. They come in clear (which I used) and also in light blue, pink and purple.
- Angel Wings Ornament: Found in the Christmas section, each ornament is a set on clear plastic angel wings. They come with white fur on them, which I removed.
- Jewel Border Stickers: Found in the craft section, these are round jewel stickers that come in a line. I used them to decorate down the front of the angel and to make the halo. The stickers come in various colors; I used clear.
- Gemstone Stickers: Also found in the craft section, these are another design of jewel/gemstone stickers that I used around the bottom of the bottle. Again they come in various colors; I used clear.
You will also need both hot glue and E6000 (permanent) glue, which can be found at any big box or craft store.
How to Make a Glass Angel
You will be able to make one of these angels in under half an hour. They look really beautiful with light coming through them, so if you can display them in a window they are just lovely; the wings pick up a rainbow effect in the light. These angels look pretty with other Christmas decorations, or could be made as a memorial craft to help remember loved ones who have passed on. Here’s how you make them:
Decorate the Bottle
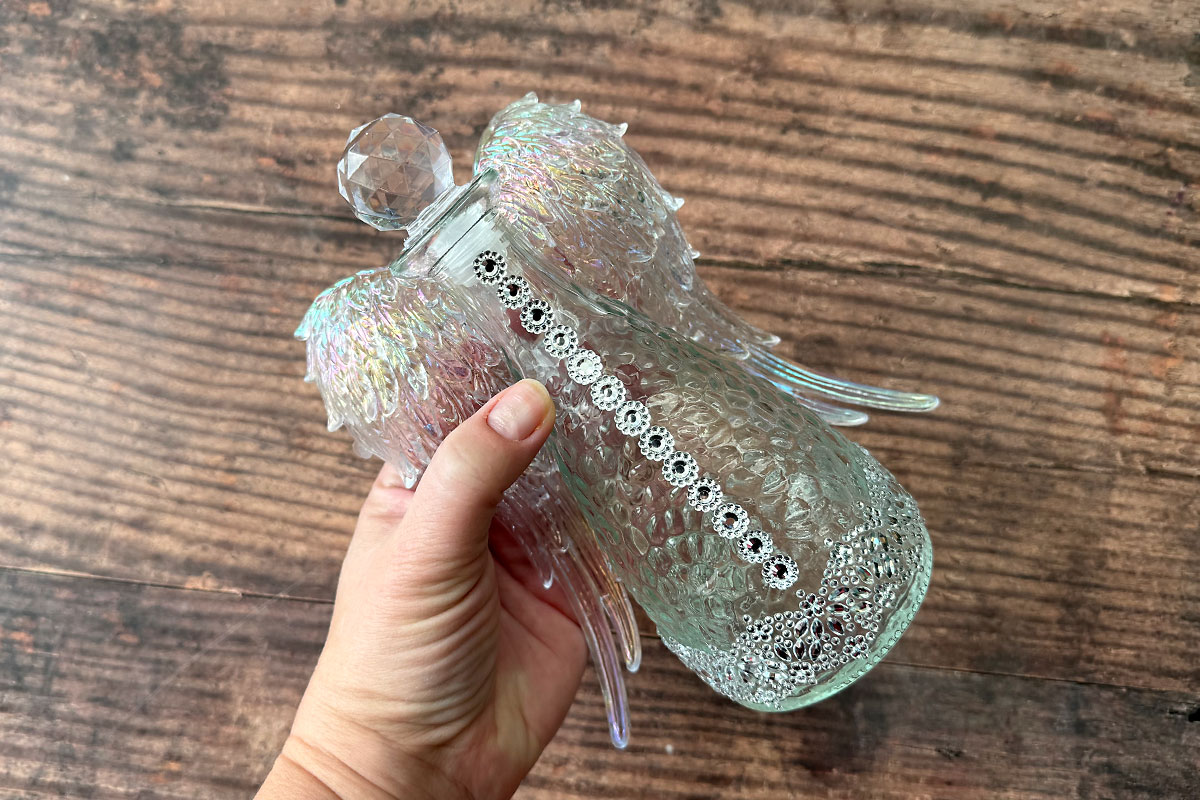
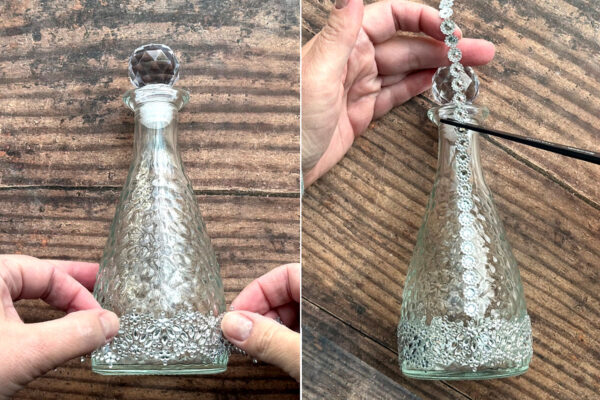
You’ll begin by using the gem/jewel stickers to decorate the glass bottle. I placed one strip of the wider gem stickers around the bottom of the bottle. One strip leaves about an inch uncovered; you can cut a piece from the second strip to fill that area or just keep that portion at the back of the angel. I also used a strip of the narrow jewel border sticker to run down the front of the bottle.

Add the Wings
Before adding the wings, you will need to remove the white fur from the wing ornament. It’s fairly easy to just pull the fur off. Some pieces of glue may remain on the wings. I used the end of a nail file to pull the bits of glue away from the wings. You could use anything with a small pointed end or may even be able to just pull the glue up with your fingernails.
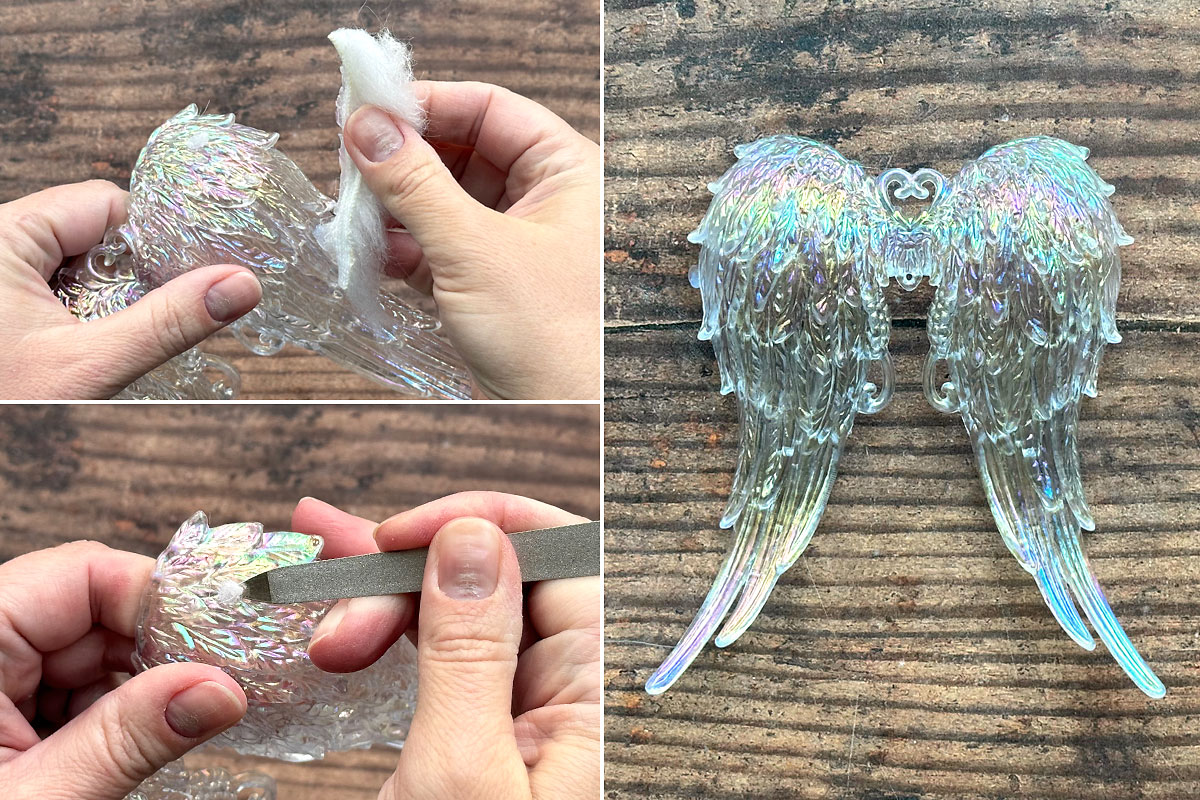
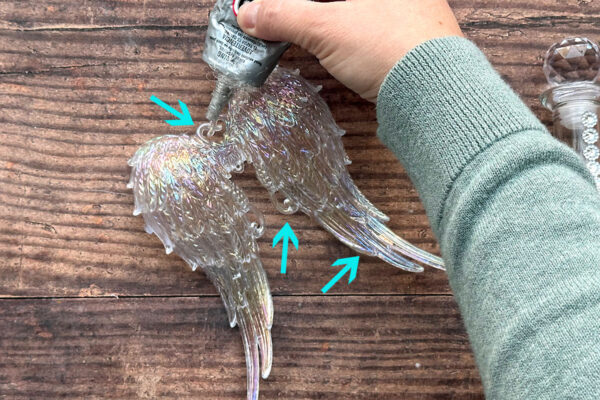
Next you want to hold the wings to the back of the bottle to see where the pieces are going to touch. I placed the wings below the lip at the top of the bottle. Note where the wings touch the back of the bottle.
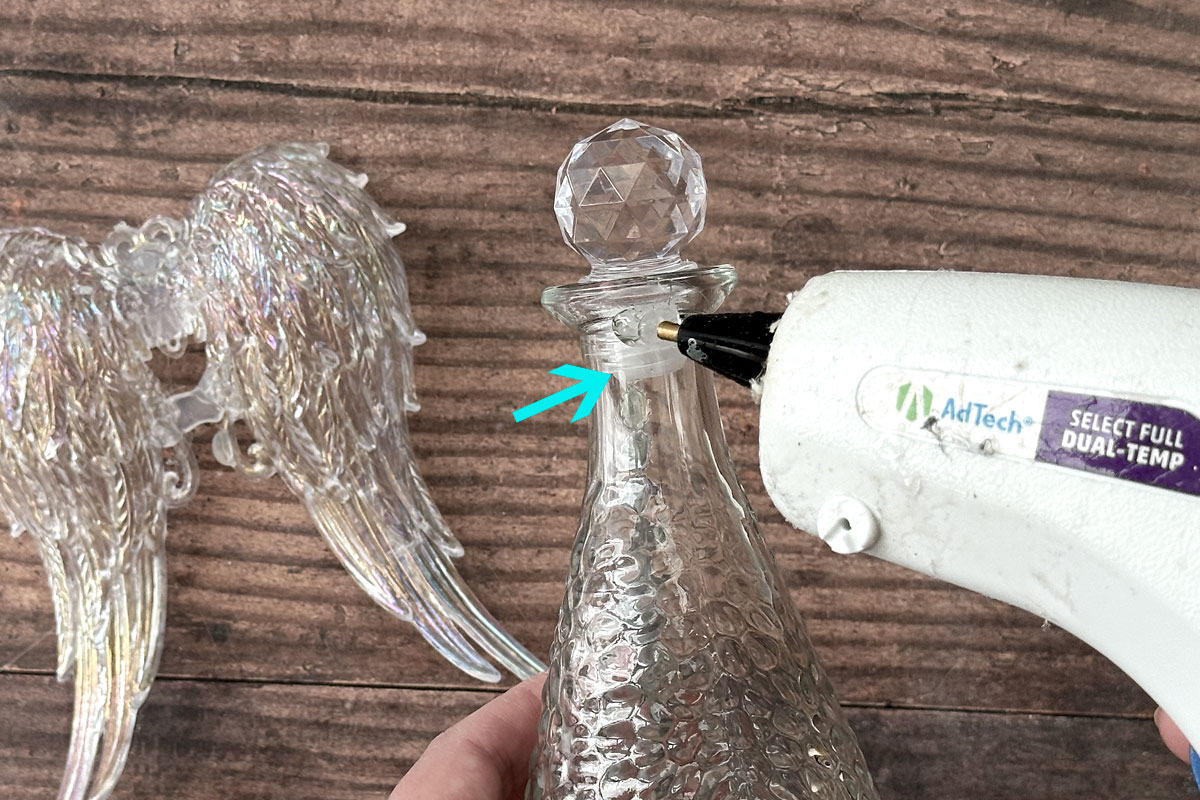
You are going to adhere the wings using both E6000 and hot glue. E6000 will create a permanent, lasting bond, but it does not hold immediately. Hot glue does hold immediately, but won’t create a very strong bond between glass and plastic. So using both glues allows you to create this project quickly but also get a lasting bond.
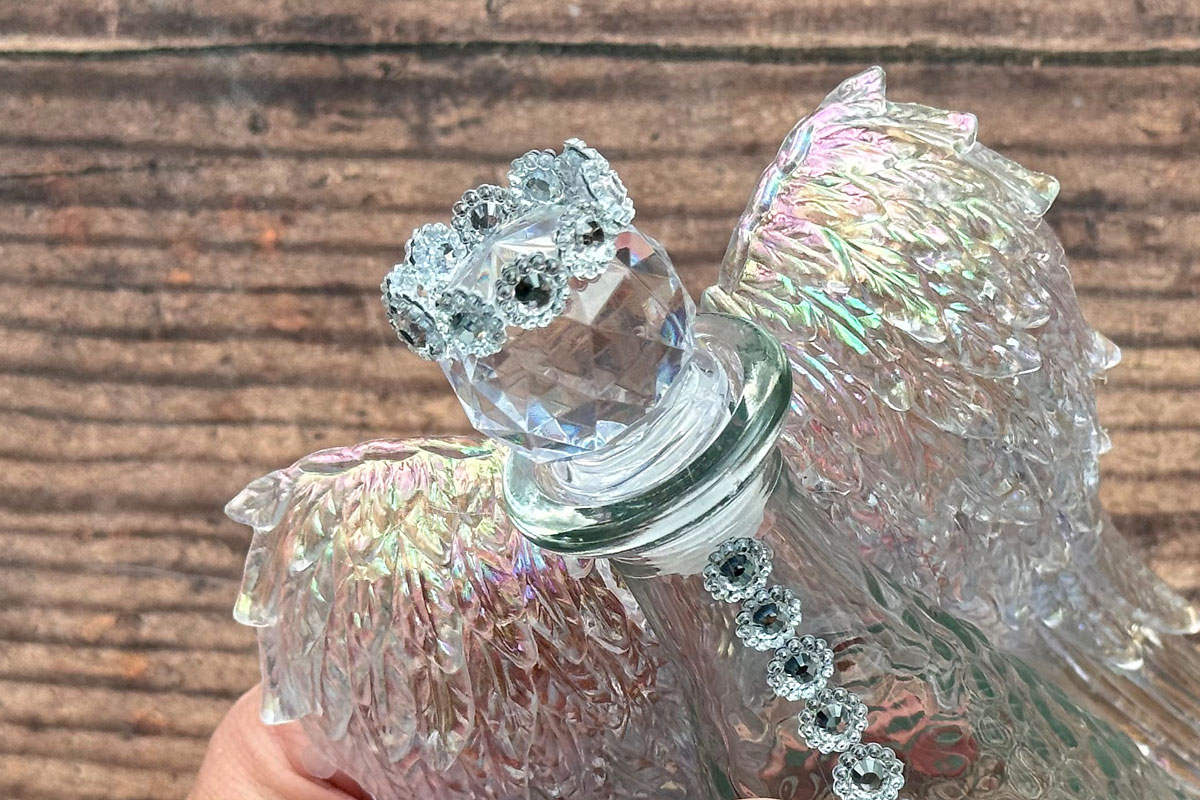
Start by placing E6000 glue on the wings in a couple different places where they will touch the back of the bottle. You can see where I used E6000 in the photo below.

Then put a generous amount of hot glue down the back of the “neck” area on the bottle:
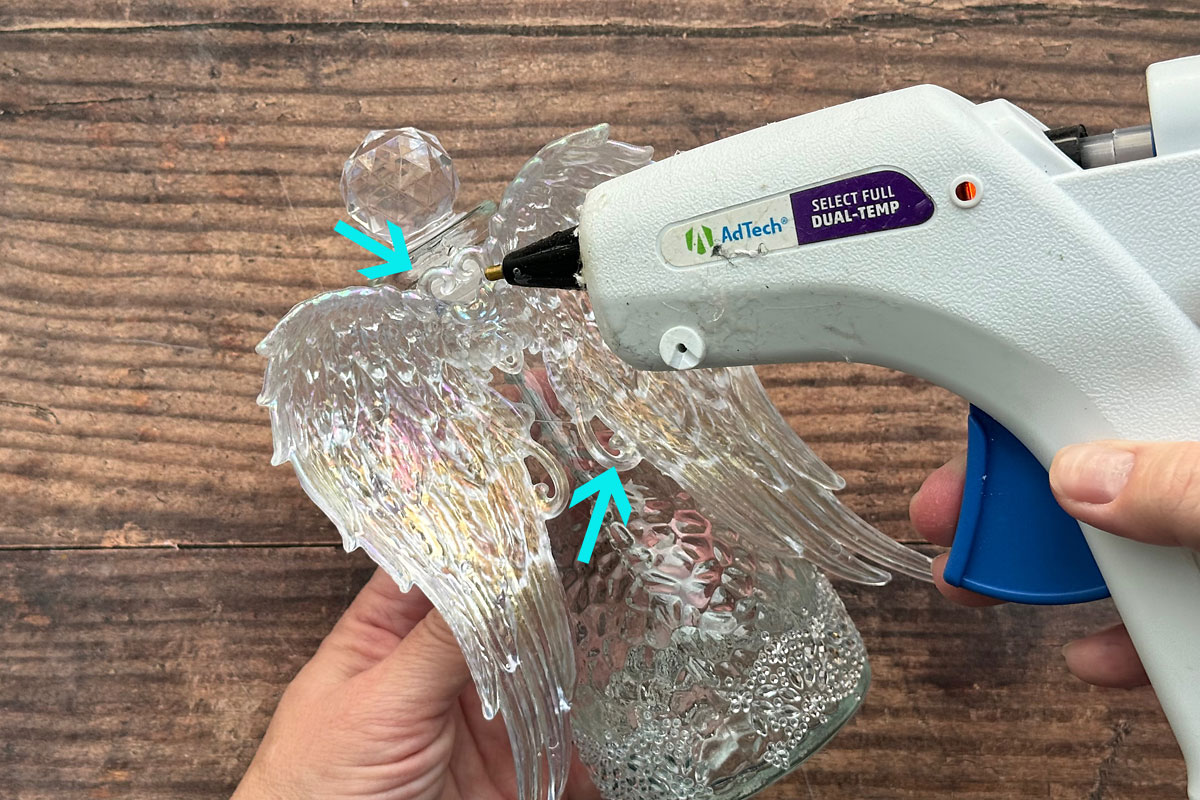
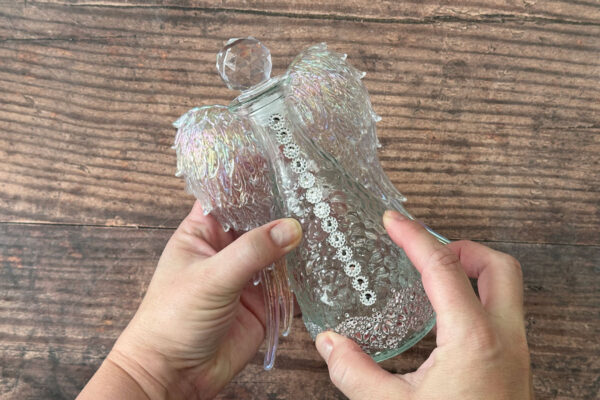
As soon as you apply the hot glue, immediately put the bottle and wings together. Hold them together with your hands for a few moments, making sure the wings touch the back of the bottle in the places you added glue. Hold until the hot glue seems secure.

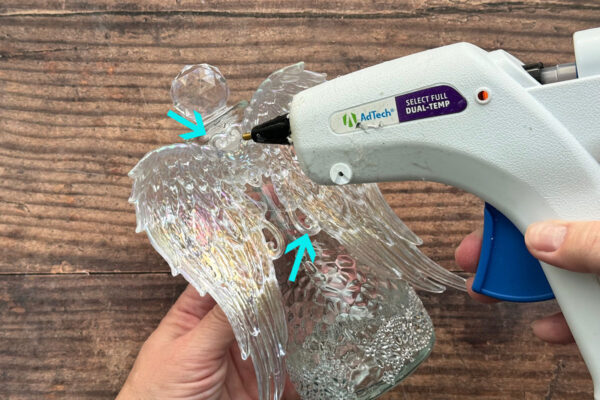
Then you can flip the angel over and add a little more hot glue in the holes in the wings to help secure them to the back of the bottle. Once that glue is dry, you can stand the angel up. The E6000 glue will take a few hours (up to 24 hours) to completely cure, so keep the angel somewhere it won’t get bumped or handled for the first day.
Add the Halo
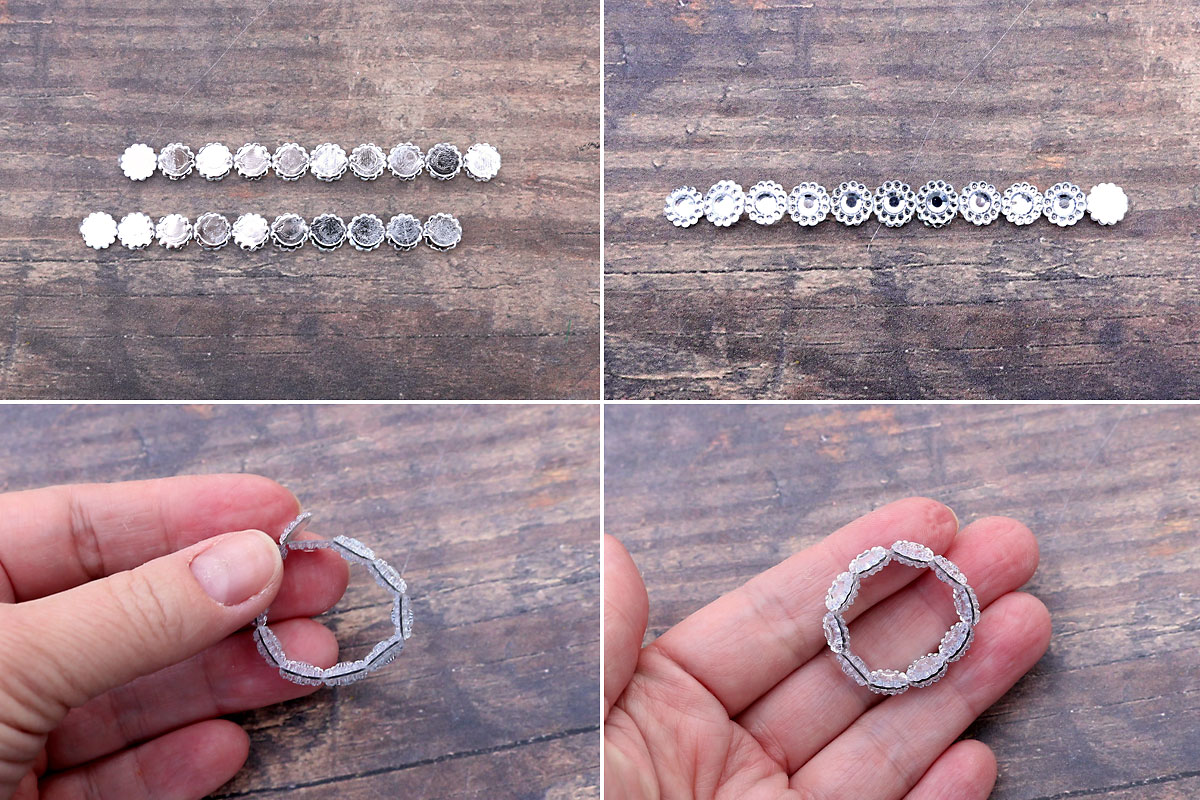
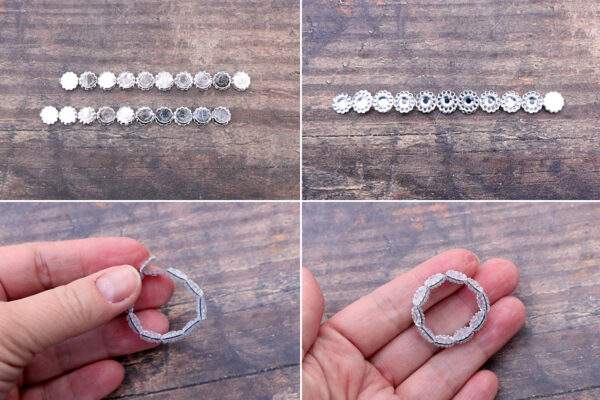
All that’s left now is to add a halo! From the narrow strip of jewel stickers, cut two pieces that are 10 jewels each.
- Place them both face down, sticky side up, and move the top strip over to the right one jewel.
- Put the strips together, sticky sides touching. There should be one jewel on the right end and one jewel on the left end that do not have jewels on the back.
- Curve the strip around into a ring, match up the sticky sides of the jewels on each end and pressing them together.
- This creates a ring of jewels that will be the angel’s halo.
Place a small amount of E6000 on one edge of halo, then place it on top of the angel’s head. Remember, the E6000 will take some times to fully cure, so once you’ve placed the halo try not to touch it again until the next day. The angel is now complete.
Glass Bottle Angels
Supplies
- Decorative Hammer Glass Bottle w/Stopper
- Angel Wing Ornament
- Narrow Jewel Border Stickers
- Wider Gemstone Border Stickers
Want more project ideas? Sign up to get my favorite easy crafts and recipes straight to your inbox!
Equipment
- Hot Glue Gun
- E6000 Glue
Instructions
- Decorate the glass bottle with wide gemstone stickers around the bottom and narrow jewel stickers running down the front.

- Pull the white for off the wing ornament. Use your fingernails or a nail file to pull up any pieces of glue that remain on the wings.
- Hold the wings to the back of the bottle and note where the wings will touch the bottle. Put E6000 glue on the spots the wings will touch the bottle.
- Place a generous amount of hot glue on the back "neck" of the bottle, then immediately place the wings and bottle together and hold for a few minutes until the hot glue hardens.
- Flip the angel over and add more hot glue through the small holes in the wings.
- Cut two pieces of the narrow jewel border that are each 10 jewels long. Offset the strips by one jewel, and then place them sticky side together, leaving one jewel on each end with nothing behind it. Wrap the jewel strip into a ring, and match up the sticky sides on the jewels on each end to create a ring.
- Use E6000 to glue the halo to the top of the angel's head. Place the angel somewhere it won't get touched for 24 hours to let the E6000 glue fully cure.

Donna says
Where do you find the jewel strips?
Autumn says
Dollar Tree!
Marilyn says
I have been making the angels for a while and sometimes have problems finding the wing ornaments. I have crocheted angle wings (many patterns on Penterest) and they work well . I also have used bottle lights to insert in the Angel for lights, just let the cork hide at the back.
Denise Johnston says
love it
Judy says
Beautiful. May I ask where you bought the plastic wings
Autumn says
They are a Christmas ornament at Dollar Tree.
Paulette says
Love this idea. Hope I can find all the bits
Thanks